Road Damage Detector 调试笔记

git clone git@github.com:sekilab/RoadDamageDetector.git

wget https://s3-ap-northeast-1.amazonaws.com/mycityreport/RoadDamageDataset.tar.gz
wget https://s3-ap-northeast-1.amazonaws.com/mycityreport/trainedModels.tar.gz

tar -zxf ./RoadDamageDataset.tar.gz
tar -zxf ./trainedModels.tar.gz

cd RoadDamageDataset

#删除掉 "Adachi", "Chiba", "Ichihara", "Muroran", "Nagakute", "Numazu", "Sumida"  子文件夹  /Annotations/ 中  ._ 开头的文件。否则执行会报错。

改写了用cv.imshow 展示的 py代码。

from xml.etree import ElementTree
from xml.dom import minidom
import collections

import os

import matplotlib.pyplot as plt
import matplotlib as matplot
import seaborn as sns
#%matplotlib inline

base_path = os.getcwd() + '/RoadDamageDataset/'
print(base_path)
damageTypes=["D00", "D01", "D10", "D11", "D20", "D40", "D43", "D44"]

# govs corresponds to municipality name.
govs = ["Adachi", "Chiba", "Ichihara", "Muroran", "Nagakute", "Numazu", "Sumida"]

# the number of total images and total labels.
cls_names = []
total_images = 0
for gov in govs:
    
    file_list = os.listdir(base_path + gov + '/Annotations/')

    for file in file_list:

        total_images = total_images + 1
        if file =='.DS_Store':
            pass
        else:
            infile_xml = open(base_path + gov + '/Annotations/' +file)
            #print(infile_xml)
            tree = ElementTree.parse(infile_xml)
            root = tree.getroot()
            for obj in root.iter('object'):
                cls_name = obj.find('name').text
                cls_names.append(cls_name)
print("total")
print("# of images:" + str(total_images))
print("# of labels:" + str(len(cls_names)))

# the number of each class labels.
import collections
count_dict = collections.Counter(cls_names)
cls_count = []
for damageType in damageTypes:
    print(str(damageType) + ' : ' + str(count_dict[damageType]))
    cls_count.append(count_dict[damageType])
    
sns.set_palette("winter", 8)
sns.barplot(damageTypes, cls_count)

# the number of each class labels for each municipality
for gov in govs:
    cls_names = []
    total_images = 0
    file_list = os.listdir(base_path + gov + '/Annotations/')

    for file in file_list:

        total_images = total_images + 1
        if file =='.DS_Store':
            pass
        else:
            infile_xml = open(base_path + gov + '/Annotations/' +file)
            tree = ElementTree.parse(infile_xml)
            root = tree.getroot()
            for obj in root.iter('object'):
                cls_name = obj.find('name').text
                cls_names.append(cls_name)
    print(gov)
    print("# of images:" + str(total_images))
    print("# of labels:" + str(len(cls_names)))
    
    count_dict = collections.Counter(cls_names)
    cls_count = []
    for damageType in damageTypes:
        print(str(damageType) + ' : ' + str(count_dict[damageType]))
        cls_count.append(count_dict[damageType])
        
    print('**************************************************')


import cv2
import random

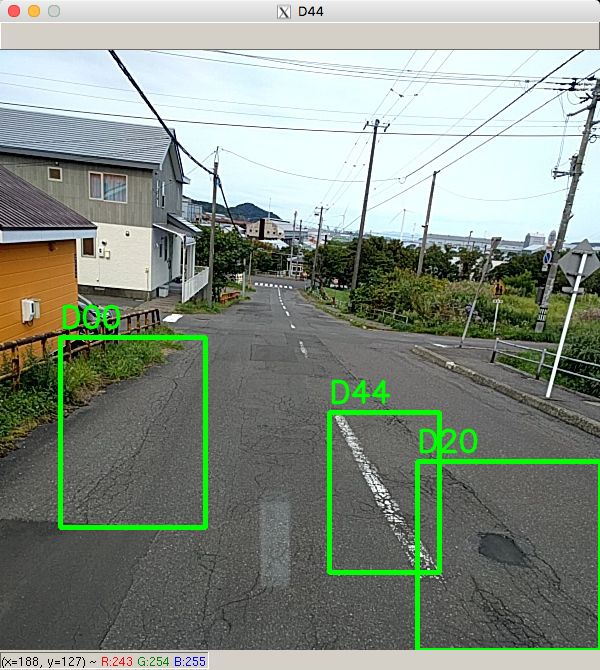
def draw_images(image_file):
    gov = image_file.split('_')[0]
    img = cv2.imread(base_path + gov + '/JPEGImages/' + image_file.split('.')[0] + '.jpg')
    print(base_path + gov + '/JPEGImages/' + image_file.split('.')[0] + '.jpg')
    infile_xml = open(base_path + gov + '/Annotations/' +image_file)
    tree = ElementTree.parse(infile_xml)
    root = tree.getroot()
    
    for obj in root.iter('object'):
        cls_name = obj.find('name').text
        xmlbox = obj.find('bndbox')
        xmin = int(xmlbox.find('xmin').text)
        xmax = int(xmlbox.find('xmax').text)
        ymin = int(xmlbox.find('ymin').text)
        ymax = int(xmlbox.find('ymax').text)

        font = cv2.FONT_HERSHEY_SIMPLEX

        # put text
        cv2.putText(img,cls_name,(xmin,ymin-10),font,1,(0,255,0),2,cv2.LINE_AA)

        # draw bounding box
        cv2.rectangle(img, (xmin, ymin), (xmax, ymax), (0,255,0),3)
    return img

for damageType in damageTypes:
    tmp = []
    for gov in govs:
        file = open(base_path + gov + '/ImageSets/Main/%s_trainval.txt' %damageType, 'r')

        for line in file:
            line = line.rstrip('\n').split('/')[-1]
            #print(line)
            if line.split(' ')[2] == '1':
                tmp.append(line.split(' ')[0]+'.xml')
        
    #print(tmp)   
    random.shuffle(tmp)
    fig = plt.figure(figsize=(6,6))
    for number, image in enumerate(tmp[0:1]):
      #if(number > 0):
        print('number & image :' + str(number) + image)
        print('The image including ' + damageType)
        img = draw_images(image)
        cv2.imshow(damageType,img)


while(1):
    if cv2.waitKey(1) & 0xFF == ord('q'):
        break 
	#plt.subplot(1,1,number)
        #plt.axis('off')
        #plt.title('The image including ' + damageType)
        #plt.imshow(cv2.cvtColor(img, cv2.COLOR_BGR2RGB))

PyFlow Optical Flow 的 python 实现

pip3 install Cython // sudo apt-get install cython3
pip3 install fasttext
pip3 install Pillow
git clone https://github.com/pathak22/pyflow.git
cd pyflow/
python3 setup.py build_ext -i
python3 demo.py    # -viz option to visualize output

修改 demo,把  car1.jpg ,car2.jpg  修改成自己的图片。
用 iphone 在黑板下沿平移拍的测试。请忽略我家混乱的客厅。/(ㄒoㄒ)/~~

KittiSeg Road Segmentation model implemented in tensorflow.

GITHUB:https://github.com/MarvinTeichmann/KittiSeg

git clone https://github.com/MarvinTeichmann/KittiSeg.gi
cd KittiSeg
git submodule update --init --recursive

python download_data.py --kitti_url  http://kitti.is.tue.mpg.de/kitti/data_road.zip

python3 demo.py --input_image data/demo/demo.png

自己找了几张图测试,效果还行。


待解决:

  1. 对非公路如石子路识别不理想。
  2. 公路车多的时候,检测不出公路
  3. 识别的时候,似乎没有使用GPU。
    1. 原因是我机器上装了 tensorflow cpu 和gpu 版,gpu 是 1.2  cpu 是1.4 这个项目在1.2上跑不起来。都卸了重装最新版的 tensorflow-gpu。
    2. 安装的时候报错。
    3.  libcudnn.so.6: cannot open shared object file: No such file or directory
    4. https://developer.nvidia.com/rdp/cudnn-download 下载新的 cudnn 安装。
    5. Navigate to your <cudnnpath> directory containing the cuDNN Tar file.
    6. Unzip the cuDNN package.
      $ tar -xzvf cudnn-9.0-linux-x64-v7.tgz
    7. Copy the following files into the CUDA Toolkit directory.
      $ sudo cp cuda/include/cudnn.h /usr/local/cuda/include
      $ sudo cp cuda/lib64/libcudnn* /usr/local/cuda/lib64
      $ sudo chmod a+r /usr/local/cuda/include/cudnn.h
      /usr/local/cuda/lib64/libcudnn*
      
      
    8.  sudo ldconfig /usr/local/cuda/lib64  #没有这步,还会出错。
    9. 2017-12-15 12:25:14.185527: I tensorflow/core/common_runtime/gpu/gpu_device.cc:1030] Found device 0 with properties:
      
      name: GeForce GTX 1080 Ti major: 6 minor: 1 memoryClockRate(GHz): 1.62
      
      pciBusID: 0000:01:00.0
      
      totalMemory: 10.90GiB freeMemory: 10.46GiB
      
      2017-12-15 12:25:14.185550: I tensorflow/core/common_runtime/gpu/gpu_device.cc:1120] Creating TensorFlow device (/device:GPU:0) -> (device: 0, name: GeForce GTX 1080 Ti, pci bus id: 0000:01:00.0, compute capability: 6.1)
    10. 问题解决了

unity 的 自动驾驶 模拟器

https://github.com/udacity/self-driving-car-sim

教程:https://www.leiphone.com/news/201706/RuoKaDSTmd1dClUV.html

运行训练好的模型。详细请看 github


sudo pip3 install python-socketio
sudo pip3 install eventlet
sudo pip3 install flask
sudo pip3 install Keras==2.0.3
sudo pip3 install h5py
python3 drive.py model.h5

下载 对应系统的 模拟器

https://d17h27t6h515a5.cloudfront.net/topher/2017/February/58983385_beta-simulator-mac/beta-simulator-mac.zip

https://d17h27t6h515a5.cloudfront.net/topher/2017/February/58983558_beta-simulator-linux/beta-simulator-linux.zip

https://d17h27t6h515a5.cloudfront.net/topher/2017/February/58983318_beta-simulator-windows/beta-simulator-windows.zip

自带的 模型不好用,会报错。自己训练之。。。开车保存数据见教程。

请不要更改IMG 目录位置,会找不到文件。

训练30轮之后,大概是这个效果

python3 drive.py model_best.h5

How we built the first real self-driving car

https://medium.com/@kyle.vogt

Self-Driving-Car-Demo 第一个无人驾驶Demo

5分钟视频系列,一个最简单的无人驾驶 demo。

GITHUB:https://github.com/llSourcell/Self-Driving-Car-Demo

环境准备

sudo apt-get install mercurial
hg clone https://bitbucket.org/pygame/pygame
cd pygame
sudo apt-get install python3-dev python3-numpy libsdl-dev libsdl-image1.2-dev \
  libsdl-mixer1.2-dev libsdl-ttf2.0-dev libsmpeg-dev libportmidi-dev \
  libavformat-dev libswscale-dev libjpeg-dev libfreetype6-dev
python3 setup.py build
sudo python3 setup.py install
wget https://github.com/viblo/pymunk/archive/pymunk-4.0.0.zip
pip install pymunk-4.0.0.zip
pip3 install keras
pip3 install git+git://github.com/Theano/Theano.git --upgrade --no-deps
pip3 install h5py

到  pymunk 目录  将 python2 的代码格式转为 python3 的

cd /usr/local/lib/python3.5/dist-packages/pymunk

2to3 -w *.py

回到  Self-Driving-Car-Demo 目录

python3 learning.py
报错
pygame.error: No video mode large enough for 1000x700

修改文件 /flat_game/carmunk.py  根据显卡情况修改。1070 的破卡,所以改的小了点。

width = 500 #1000
height = 350 #700

漫长的训练ing   ( 根据说明大概需要 36 hour)

25000 轮后报错 /(ㄒoㄒ)/~~

OSError: Unable to create file (unable to open file: name = ‘saved-models/164-150-100-50000-25000.h5’, errn
o = 2, error message = ‘No such file or directory’, flags = 13, o_flags = 242)

创建  saved-models 文件夹。重新训练。。。。

pip3 install matplotlib
apt install python3-tk
python3 plotting.py

修改  nn.py 中 model 的名字。

python3 playing.py


百度自动驾驶框架 Apollo 安装调试笔记

github https://github.com/ApolloAuto/apollo

执行编译命令时出如下错误。

bash apollo.sh build 
ERROR: /home/endler/.cache/bazel/_bazel_root/b7f360582ec6dbe2ec241ba71c25765a/external/com_google_protobuf/BUILD:441:1: Traceback (most recent call last):
 File "/home/endler/.cache/bazel/_bazel_root/b7f360582ec6dbe2ec241ba71c25765a/external/com_google_protobuf/BUILD", line 441
 cc_proto_library(name = "cc_test_protos", srcs = (L...), <4 more arguments>)
 File "/home/endler/.cache/bazel/_bazel_root/b7f360582ec6dbe2ec241ba71c25765a/external/com_google_protobuf/protobuf.bzl", line 247, in cc_proto_library
 cc_libs += [default_runtime]
trying to mutate a frozen object
ERROR: /home/endler/.cache/bazel/_bazel_root/b7f360582ec6dbe2ec241ba71c25765a/external/com_google_protobuf/BUILD:742:1: Traceback (most recent call last):
 File "/home/endler/.cache/bazel/_bazel_root/b7f360582ec6dbe2ec241ba71c25765a/external/com_google_protobuf/BUILD", line 742
 py_proto_library(name = "python_specific_test_pro...", <6 more arguments>)
 File "/home/endler/.cache/bazel/_bazel_root/b7f360582ec6dbe2ec241ba71c25765a/external/com_google_protobuf/protobuf.bzl", line 373, in py_proto_library
 py_libs += [default_runtime]
trying to mutate a frozen object

执行下面命令时访问不了, 导致 protobuf 安装失败

bash docker/scripts/install_docker.sh
# logout and login the computer to make sure to run docker command without sudo
docker ps  # to verify docker works without sudo
# in case you forgot to logout and login back, do so, remove ~/.docker/config.json
# and check again with `docker ps`
bash docker/scripts/dev_start.sh
bash docker/scripts/dev_into.sh

手动安装

wget  https://github.com/google/protobuf/releases/download/v3.3.0/protobuf-cpp-3.3.0.tar.gz
tar -zxf protobuf-cpp-3.3.0.tar.gz
#mkdir /usr/local/protobuf-3.3.0

#cd /usr/local/protobuf-3.3.0
#~/protobuf-3.3.0/configure -prefix=/usr/local/protobuf-3.3.0
#sudo make -j8
#sudo make check
#sudo make install

bash docker/scripts/dev_into.sh  时提示

unable to find user endler: no matching entries in passwd file

在  docker 创建时出错,删了重新安装

docker stop $(docker ps -a -q)

docker rm $(docker ps -a -q)

从最初跑一遍程序,build 正常了。

启动成功,但是报:

Please send car initial position and map data.

原因是没装完。

# in a different terminal, in the apollo directory
bash docker/scripts/dev_into.sh # jump into the docker container
bash ./docs/demo_guide/rosbag_helper.sh download # download rosbag
rosbag play -l ./docs/demo_guide/demo_1.5.np.bag

rosbag play -l ./docs/demo_guide/demo.bag  #另一个demo


安装好各种依赖

sudo apt install python-genmsg

sudo apt install python-rosgraph-msgs

sudo apt install python-genpy