添加一行
innerAudioContext.obeyMuteSwitch = false;
innerAudioContext.obeyMuteSwitch = false;添加一行
innerAudioContext.obeyMuteSwitch = false;
innerAudioContext.obeyMuteSwitch = false;8.0之后的android 需要创建 channel 否则 notification 不显示。
final String CHANNEL_ID = "channel_id_1";
final String CHANNEL_NAME = "channel_name_1";

NotificationManager mNotificationManager = (NotificationManager)
getSystemService(Context.NOTIFICATION_SERVICE);

if (android.os.Build.VERSION.SDK_INT >= android.os.Build.VERSION_CODES.O) {
//只在Android O之上需要渠道
NotificationChannel notificationChannel = new NotificationChannel(CHANNEL_ID,
CHANNEL_NAME, NotificationManager.IMPORTANCE_HIGH);
//如果这里用IMPORTANCE_NOENE就需要在系统的设置里面开启渠道,
//通知才能正常弹出
mNotificationManager.createNotificationChannel(notificationChannel);
}
NotificationCompat.Builder builder= new NotificationCompat.Builder(this,CHANNEL_ID);

builder.setSmallIcon(R.mipmap.ic_launcher)
.setContentTitle("通知标题")
.setContentText("通知内容")
.setAutoCancel(true);

mNotificationManager.notify(notificationId, builder.build());
联网权限
app/manifests/AndroidManiifest.xml 文件 <application 上 添加
<uses-permission android:name="android.permission.INTERNET"/>
build.gradle(Module:app) 文件 dependencies 内加一行
compile 'com.squareup.okhttp3:okhttp:3.10.0'
Activity 文件。
package com.example.zhiweipang.xindong;

import android.os.Bundle;
import android.support.design.widget.FloatingActionButton;
import android.support.design.widget.Snackbar;
import android.support.v7.app.AppCompatActivity;
import android.support.v7.widget.Toolbar;
import android.util.Log;
import android.view.View;
import android.view.Menu;
import android.view.MenuItem;
import okhttp3.OkHttpClient;
import okhttp3.Request;
import okhttp3.Response;
import java.io.IOException;

public class MainActivity extends AppCompatActivity {
    OkHttpClient client = new OkHttpClient();

    @Override
    protected void onCreate(Bundle savedInstanceState) {
        super.onCreate(savedInstanceState);
        setContentView(R.layout.activity_main);
        Toolbar toolbar = (Toolbar) findViewById(R.id.toolbar);
        setSupportActionBar(toolbar);

        FloatingActionButton fab = (FloatingActionButton) findViewById(R.id.fab);
        fab.setOnClickListener(new View.OnClickListener() {
            @Override
            public void onClick(View view) {
                Snackbar.make(view, "Replace with your own action", Snackbar.LENGTH_LONG)
                        .setAction("Action", null).show();
                getRequest();
            }
        });


    }
    private void getRequest() {

        final Request request=new Request.Builder()
                .get()
                .tag(this)
                .url("http://www.baidu.com")
                .build();

        new Thread(new Runnable() {
            @Override
            public void run() {
                Response response = null;
                try {
                    response = client.newCall(request).execute();
                    if (response.isSuccessful()) {
                        Log.i("WY","打印GET响应的数据:" + response.body().string());
                    } else {
                        throw new IOException("Unexpected code " + response);
                    }
                } catch (IOException e) {
                    e.printStackTrace();
                }
            }
        }).start();

    }
    @Override
    public boolean onCreateOptionsMenu(Menu menu) {
        // Inflate the menu; this adds items to the action bar if it is present.
        getMenuInflater().inflate(R.menu.menu_main, menu);
        return true;
    }

    @Override
    public boolean onOptionsItemSelected(MenuItem item) {
        // Handle action bar item clicks here. The action bar will
        // automatically handle clicks on the Home/Up button, so long
        // as you specify a parent activity in AndroidManifest.xml.
        int id = item.getItemId();

        //noinspection SimplifiableIfStatement
        if (id == R.id.action_settings) {
            return true;
        }

        return super.onOptionsItemSelected(item);
    }
}
GITHUB:https://github.com/endpang/xindong
GITHUB:https://github.com/endpang/opencvdemo
实现了寻找边缘和自定义上色。
Expected identifier
解决办法
把 NO 改为
NO_EXPOSURE_COMPENSATOR = 0
libc++.tbd
AVFoundation.framework
CoreImage.framework
CoreGraphics.framework
QuartzCore.framework
Accelerate.framework

//摄像头
CoreVideo.framework
CoreMedia.framework
AssetsLibrary.framework
#import "ViewController.h"
#import <opencv2/opencv.hpp>
#import <opencv2/videoio/cap_ios.h>

//@interface ViewController ()


@interface ViewController ()<CvVideoCameraDelegate>{
    UIImageView *cameraView;
    CvVideoCamera *videoCamera;
}
@end

@implementation ViewController

- (void)viewDidLoad {
    [super viewDidLoad];
    // Do any additional setup after loading the view, typically from a nib.
    cameraView = [[UIImageView alloc] initWithFrame:self.view.frame];
    [self.view addSubview:cameraView];

    videoCamera = [[CvVideoCamera alloc] initWithParentView:cameraView];
    videoCamera.defaultAVCaptureDevicePosition = AVCaptureDevicePositionFront;
    videoCamera.defaultAVCaptureSessionPreset = AVCaptureSessionPreset1920x1080;
    videoCamera.defaultAVCaptureVideoOrientation = AVCaptureVideoOrientationPortrait;
    videoCamera.defaultFPS = 60;
    videoCamera.grayscaleMode = NO;
    videoCamera.delegate = self;
}
- (void)viewDidAppear:(BOOL)animated {
    [super viewDidAppear:animated];
    [videoCamera start];
}

- (void)viewWillDisappear:(BOOL)animated {
    [super viewWillDisappear:animated];
    [videoCamera stop];
}

#pragma mark -  CvVideoCameraDelegate
- (void)processImage:(cv::Mat&)image {
    //在这儿我们将要添加图形处理的代码
    cv::Mat image_copy;
    //首先将图片由RGBA转成GRAY
    cv::cvtColor(image, image_copy, cv::COLOR_BGR2GRAY);
    //反转图片
    cv::bitwise_not(image_copy, image_copy);
    //将处理后的图片赋值给image,用来显示
    cv::cvtColor(image_copy, image, cv::COLOR_GRAY2BGR);
}


- (void)didReceiveMemoryWarning {
    [super didReceiveMemoryWarning];
    // Dispose of any resources that can be recreated.
}
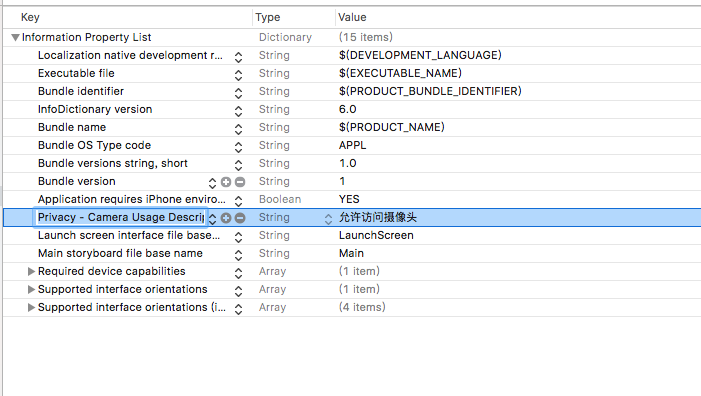
plist 里加入 Privacy – Camera Usage Description
服务器端代码
8000 端口的服务是 https://github.com/lllyasviel/style2paints
k.png 是一张纯白色 png
<?php
/**/
//print_R($_FILES);
$imgname = $_FILES['upload1']['name'];
$tmp = $_FILES['upload1']['tmp_name'];
$filepath = 'photo/';
if(move_uploaded_file($tmp,$filepath.$imgname)){
    //echo "上传成功";
    my_post($filepath.$imgname);
}else{
    echo "上传失败";
}
//*/
//my_post("photo/20180118172008.png");
function my_post($filename){
    $url = "http://172.18.100.205:8000/paint";

    $headers[] = 'Origin: http://172.18.100.205:8000';
    $headers[] = 'Accept-Encoding: gzip, deflate';
    $headers[] = 'Accept-Language: zh-CN,zh;q=0.9,en;q=0.8';
    $headers[] = 'User-Agent: Mozilla/5.0 (Macintosh; Intel Mac OS X 10_12_6) AppleWebKit/537.36 (KHTML, like Gecko) Chrome/63.0.3239.132 Safari/537.36';
    $headers[] = 'Content-Type: application/x-www-form-urlencoded;';
    $headers[] = 'Accept: */*';
    $headers[] = 'Referer: http://172.18.100.205:8000/';
    $headers[] = 'Cookie: scale=2; style=photo; noise=2';
    $headers[] = 'Connection: keep-alive';
    //$post_data = array ("username" => "bob","key" => "12345");
    $ch = curl_init();
    $post_data = [];
    $post_data["sketchDenoise"] = "true";
    $post_data["resultDenoise"] = "true";
    $post_data["algrithom"] = "quality";
    $post_data["method"] = "colorize";
    $post_data["sketchID"] = "new";
    $post_data["referenceID"] = "no";
    //$b6 = "data%3Aimage%2Fpng%3Bbase64%2C";
    $b5 = "data:image/jpeg;base64,";
    $b6 = "data:image/png;base64,";
    //echo base64_encode($b6);
    $post_data["hint"] = $b6.base64_encode(file_get_contents("k.png"));
    $post_data["reference"] ="null" ;//$b6.base64_encode(file_get_contents("108_copy.png"));
    //$post_data["reference"] = null;
    $post_data["sketch"] = $b6.base64_encode(file_get_contents($filename));
    curl_setopt($ch, CURLOPT_HTTPHEADER, $headers);
    curl_setopt($ch, CURLOPT_URL, $url);
    curl_setopt($ch, CURLOPT_RETURNTRANSFER, 1);
    // post数据
    curl_setopt($ch, CURLOPT_POST, 1);
    // post的变
    //echo $post_data["sketch"];
    //print_R(http_build_query($post_data));
    curl_setopt($ch, CURLOPT_POSTFIELDS, http_build_query($post_data));

    $output = curl_exec($ch);
    $out_array = explode('*',$output);

    curl_close($ch);
    echo "http://172.18.100.205:8000/results/".$out_array[0].".jpg";
    //print_R($output);
}
No module named ‘skimage’ (python3)
apt install . python3-skimage
它默认支持三种网络,
TF_OD_API, MULTIBOX, YOLO;
除了 YOLO ,都给了下载链接,想试试 YOLO ,没找到
graph-tiny-yolo-voc.pb
的下载,自己动手丰衣足食。
git clone git@github.com:thtrieu/darkflow.git
cd darkflow
python3 setup.py build_ext --inplacepip install -e .下载对应的 yolo weight 文件
wget https://pjreddie.com/media/files/yolo.weights
更多权重文件下载 :https://drive.google.com/drive/folders/0B1tW_VtY7onidEwyQ2FtQVplWEU
https://pjreddie.com/darknet/yolo/
flow --model cfg/yolo.cfg --load yolo.weights --savepb
Parsing ./cfg/yolo.cfg
Parsing cfg/yolo.cfg
Loading yolo.weights ...
Successfully identified 203934260 bytes
Finished in 0.008934736251831055s
Model has a coco model name, loading coco labels.

Building net ...
Source | Train? | Layer description | Output size
-------+--------+----------------------------------+---------------
 | | input | (?, 608, 608, 3)
 Load | Yep! | conv 3x3p1_1 +bnorm leaky | (?, 608, 608, 32)
 Load | Yep! | maxp 2x2p0_2 | (?, 304, 304, 32)
 Load | Yep! | conv 3x3p1_1 +bnorm leaky | (?, 304, 304, 64)
 Load | Yep! | maxp 2x2p0_2 | (?, 152, 152, 64)
 Load | Yep! | conv 3x3p1_1 +bnorm leaky | (?, 152, 152, 128)
 Load | Yep! | conv 1x1p0_1 +bnorm leaky | (?, 152, 152, 64)
 Load | Yep! | conv 3x3p1_1 +bnorm leaky | (?, 152, 152, 128)
 Load | Yep! | maxp 2x2p0_2 | (?, 76, 76, 128)
 Load | Yep! | conv 3x3p1_1 +bnorm leaky | (?, 76, 76, 256)
 Load | Yep! | conv 1x1p0_1 +bnorm leaky | (?, 76, 76, 128)
 Load | Yep! | conv 3x3p1_1 +bnorm leaky | (?, 76, 76, 256)
 Load | Yep! | maxp 2x2p0_2 | (?, 38, 38, 256)
 Load | Yep! | conv 3x3p1_1 +bnorm leaky | (?, 38, 38, 512)
 Load | Yep! | conv 1x1p0_1 +bnorm leaky | (?, 38, 38, 256)
 Load | Yep! | conv 3x3p1_1 +bnorm leaky | (?, 38, 38, 512)
 Load | Yep! | conv 1x1p0_1 +bnorm leaky | (?, 38, 38, 256)
 Load | Yep! | conv 3x3p1_1 +bnorm leaky | (?, 38, 38, 512)
 Load | Yep! | maxp 2x2p0_2 | (?, 19, 19, 512)
 Load | Yep! | conv 3x3p1_1 +bnorm leaky | (?, 19, 19, 1024)
 Load | Yep! | conv 1x1p0_1 +bnorm leaky | (?, 19, 19, 512)
 Load | Yep! | conv 3x3p1_1 +bnorm leaky | (?, 19, 19, 1024)
 Load | Yep! | conv 1x1p0_1 +bnorm leaky | (?, 19, 19, 512)
 Load | Yep! | conv 3x3p1_1 +bnorm leaky | (?, 19, 19, 1024)
 Load | Yep! | conv 3x3p1_1 +bnorm leaky | (?, 19, 19, 1024)
 Load | Yep! | conv 3x3p1_1 +bnorm leaky | (?, 19, 19, 1024)
 Load | Yep! | concat [16] | (?, 38, 38, 512)
 Load | Yep! | conv 1x1p0_1 +bnorm leaky | (?, 38, 38, 64)
 Load | Yep! | local flatten 2x2 | (?, 19, 19, 256)
 Load | Yep! | concat [27, 24] | (?, 19, 19, 1280)
 Load | Yep! | conv 3x3p1_1 +bnorm leaky | (?, 19, 19, 1024)
 Load | Yep! | conv 1x1p0_1 linear | (?, 19, 19, 425)
-------+--------+----------------------------------+---------------
Running entirely on CPU
2017-12-08 17:49:27.012124: I tensorflow/core/platform/cpu_feature_guard.cc:137] Your CPU supports instructions that this TensorFlow binary was not compiled to use: SSE4.1 SSE4.2 AVX AVX2 FMA
Finished in 5.091068267822266s

Rebuild a constant version ...
Done
训练好的文件在 ./built_graph/ 文件夹
将生成的文件拷贝到
android_asset
中
编译成功。。。
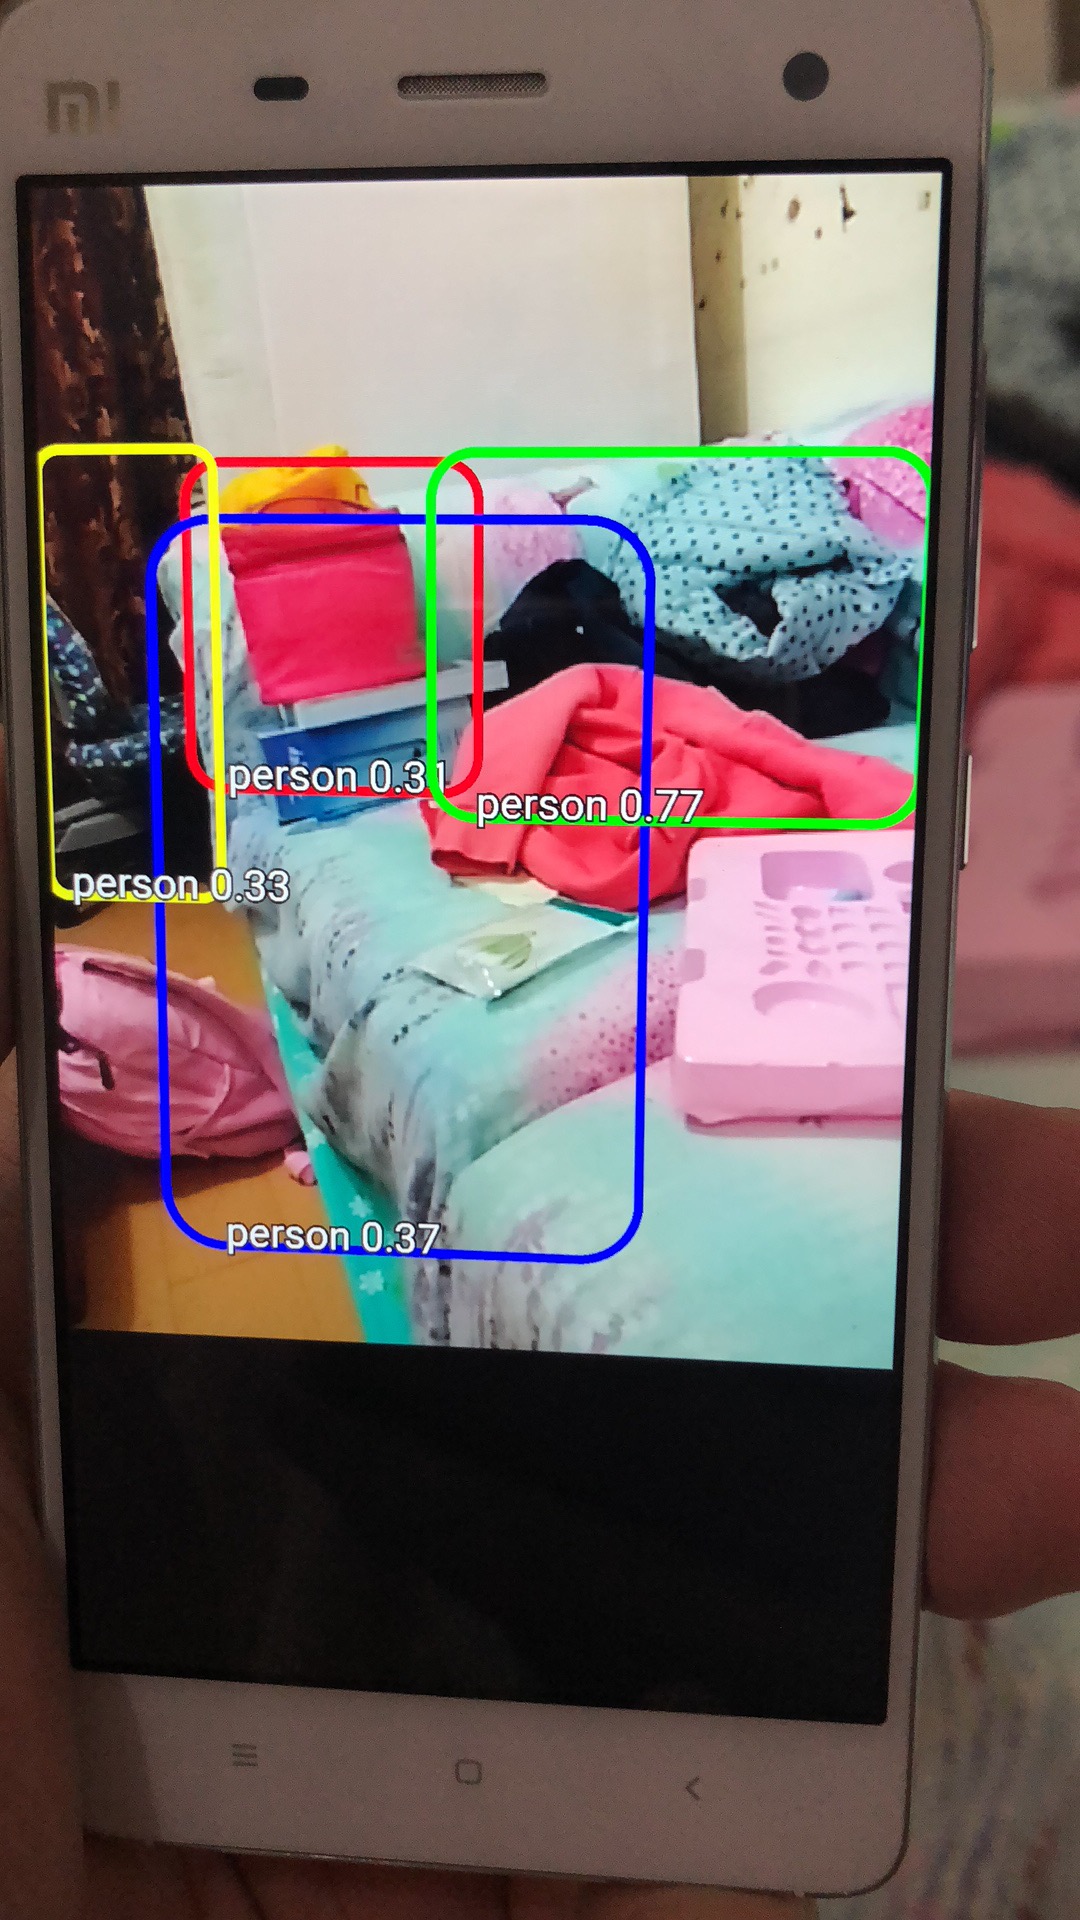
效果不是很理想,很多东西被认成 person 了。。。
下载 tensorflow 代码,到目录
/tensorflow/contrib/lite/examples/ios/simple/
安装pods
sudo gem install cocoapods
pod install --verbose --no-repo-update
漫长的等待后打开
simple.xcworkspace
报错
tensorflow/contrib/lite/schema/schema_generated.h:7:10: 'flatbuffers/flatbuffers.h' file not found
FlatBuffers 没装
xcode-select --install
brew install automake
brew install libtool
下面命令需要退到 根目录下执行,否则找不到对应目录,另需已安装 wget
tensorflow/contrib/lite/download_dependencies.sh
在 cp 前 莫名 有个 echo ,导致 cp 不执行。需要手动下载这些包,再传到制定目录。
tensorflow/contrib/lite/build_ios_universal_lib.sh
编译不成功,感觉 这个 lite 版的 ios 还没有完工。也可能是我这台 imac的问题,回家用macpro 试试再说。
特别注意:全程请保持网络能正常访问 google
GITHUB:https://github.com/tensorflow/tensorflow/tree/master/tensorflow/examples/android
git clone --recurse-submodules https://github.com/tensorflow/tensorflow
git clone git@github.com:tensorflow/tensorflow.git
Error:Execution failed for task ':buildNativeBazel'.

> A problem occurred starting process 'command '/usr/local/bin/bazel''
brew cask install caskroom/versions/java8
brew install bazelhttps://dl.google.com/android/repository/android-ndk-r12b-darwin-x86_64.zip
bazel build -c opt //tensorflow/examples/android:tensorflow_demo
This build requires an Android SDK. Please add the android_sdk_repository rule to your WORKSPACE.
clang: error: unknown argument: '-m<platform_for_version_min>-version-min=11.1'
打开 tensorflow 根目录下的 WORKSPACE 编辑 sdk 和 ndk
C++ compilation of rule '@protobuf_archive//:protobuf' failed (Exit 1).

fatal error: 'stdlib.h' file not found

#include <stdlib.h>
原因是 git 时没有加 –recurse-submodules 参数 。用于获取 TesorFlow 依赖的 protobuf 库
https://dl.google.com/android/repository/android-ndk-r12b-darwin-x86_64.zip
Target //tensorflow/examples/android:tensorflow_demo up-to-date:

 bazel-bin/tensorflow/examples/android/tensorflow_demo_deploy.jar

 bazel-bin/tensorflow/examples/android/tensorflow_demo_unsigned.apk

 bazel-bin/tensorflow/examples/android/tensorflow_demo.apk

INFO: Elapsed time: 861.504s, Critical Path: 99.12s
//tensorflow/bazel-out/darwin_x86_64-opt/bin/tensorflow/examples/android/tensorflow_demo.apk
adb install -r ./bazel-out/darwin_x86_64-opt/bin/tensorflow/examples/android/tensorflow_demo.apk
mac安装 adb
brew cask install android-platform-tools
Gradle sync failed: Cause: error in opening zip file
 Consult IDE log for more details (Help | Show Log) (451ms)
将 gradle-wrapper.properties 中
distributionUrl=https\://services.gradle.org/distributions/gradle-4.1-all.zip
替换成
distributionUrl=http\://services.gradle.org/distributions/gradle-4.1-all.zip
出错误Xcode version must be specified to use an Apple CROSSTOOL
bazel clean --expunge

sudo xcode-select -s /Applications/Xcode.app/Contents/Developer

sudo xcodebuild -license