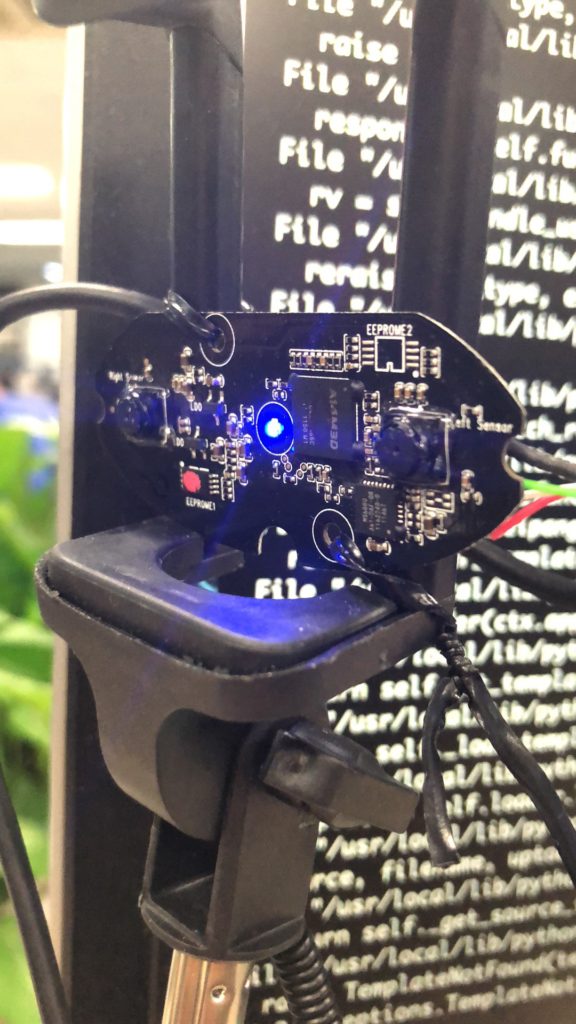
首先你要准备一个3d 摄像头。比如这样的。
28买的。。。640 x 480 ,有色车不推荐买。缺银子的可以考虑。自己焊usb线款的18。
只想本地看的 ,看这篇文章

将摄像头的视频数据通过 RTSP 输出。代码如下。
import cv2
import usb.core
import usb.backend.libusb1
from flask import Flask, render_template, Response

# cam=cv2.VideoCapture(1)
# backend = usb.backend.libusb1.get_backend(find_library=lambda x: "/usr/lib/libusb-1.0.so")
#
# dev = usb.core.find(idVendor=0x18e3, idProduct=0x5031, backend=backend)
# # simulate the SET_CUR sequence
# dev.ctrl_transfer(0x21,0x01,0x0800,0x0600,[0x50,0xff])
# dev.ctrl_transfer(0x21,0x01,0x0f00,0x0600,[0x00,0xf6])
# dev.ctrl_transfer(0x21,0x01,0x0800,0x0600,[0x25,0x00])
# dev.ctrl_transfer(0x21,0x01,0x0800,0x0600,[0x5f,0xfe])
# dev.ctrl_transfer(0x21,0x01,0x0f00,0x0600,[0x00,0x03])
# dev.ctrl_transfer(0x21,0x01,0x0f00,0x0600,[0x00,0x02])
# dev.ctrl_transfer(0x21,0x01,0x0f00,0x0600,[0x00,0x12])
# dev.ctrl_transfer(0x21,0x01,0x0f00,0x0600,[0x00,0x04])
# dev.ctrl_transfer(0x21,0x01,0x0800,0x0600,[0x76,0xc3])

class VideoCamera(object):
 def __init__(self):
 # Using OpenCV to capture from device 0. If you have trouble capturing
 # from a webcam, comment the line below out and use a video file
 # instead.
 self.video = cv2.VideoCapture(1)
 # If you decide to use video.mp4, you must have this file in the folder
 # as the main.py.
 # self.video = cv2.VideoCapture('video.mp4')
 # cam=cv2.VideoCapture(1)
 backend = usb.backend.libusb1.get_backend(find_library=lambda x: "/usr/lib/libusb-1.0.so")
 #
 dev = usb.core.find(idVendor=0x18e3, idProduct=0x5031, backend=backend)
 # # simulate the SET_CUR sequence
 dev.ctrl_transfer(0x21,0x01,0x0800,0x0600,[0x50,0xff])
 dev.ctrl_transfer(0x21,0x01,0x0f00,0x0600,[0x00,0xf6])
 dev.ctrl_transfer(0x21,0x01,0x0800,0x0600,[0x25,0x00])
 dev.ctrl_transfer(0x21,0x01,0x0800,0x0600,[0x5f,0xfe])
 dev.ctrl_transfer(0x21,0x01,0x0f00,0x0600,[0x00,0x03])
 dev.ctrl_transfer(0x21,0x01,0x0f00,0x0600,[0x00,0x02])
 dev.ctrl_transfer(0x21,0x01,0x0f00,0x0600,[0x00,0x12])
 dev.ctrl_transfer(0x21,0x01,0x0f00,0x0600,[0x00,0x04])
 dev.ctrl_transfer(0x21,0x01,0x0800,0x0600,[0x76,0xc3])
 dev.ctrl_transfer(0x21,0x01,0x0a00,0x0600,[2,0x00])
 #1:left 2:right 3:red & blue 4:2to1
 self.dev = dev


 def __del__(self):
 self.video.release()

 def get_frame(self):
 success, image = self.video.read()
 image = cv2.resize(image, (640, 480), interpolation=cv2.INTER_CUBIC)
 # We are using Motion JPEG, but OpenCV defaults to capture raw images,
 # so we must encode it into JPEG in order to correctly display the
 # video stream.
 ret, jpeg = cv2.imencode('.jpg', image)
 return jpeg.tobytes()

# k=0
 # while (k!=ord('q')):
 # ret, frame=cam.read()
 # frame = cv2.resize(frame,(640,480),interpolation=cv2.INTER_CUBIC)
 # cv2.imshow("cam_test",frame)
 #
 # k=cv2.waitKey(18)&0xFF
 #
 # kv=k-ord('0')
 # # print(kv)
 # # if press 1,2,3 or 4, change the 3d camera mode
 # if kv in [1,2,3,4]:
 # dev.ctrl_transfer(0x21,0x01,0x0a00,0x0600,[kv,0x00])

app = Flask(__name__)

@app.route('/')
def index():
 return render_template('index.html')

def gen(camera):
 while True:
 frame = camera.get_frame()
 yield (b'--frame\r\n'
 b'Content-Type: image/jpeg\r\n\r\n' + frame + b'\r\n\r\n')

@app.route('/video_feed')
def video_feed():
 return Response(gen(VideoCamera()),
 mimetype='multipart/x-mixed-replace; boundary=frame')

if __name__ == '__main__':
 app.run(host='0.0.0.0', debug=True)
然后通过访问 http://127.0.0.1:5000/video_feed 试试
如果可以去 openpose 执行
./build/examples/openpose/openpose.bin –ip_camera http://xxx.xxx.xxx.xxx:5000/video_feed
OK
直接访问 http://127.0.0.1:5000/video_feed 也可以看到,但推流部分还不支持多路并发,有时间再弄。

openpose 如何处理3d 视频流,以后再继续吧。