Age Gender Estimate TF 一个tensorflow 识别年龄的demo

GITHUB:https://github.com//BoyuanJiang/Age-Gender-Estimate-TF

clone 代码。

下载数据集 到  ~/data

wget   https://data.vision.ee.ethz.ch/cvl/rrothe/imdb-wiki/static/imdb_crop.tar

加压缩

tar -xvf imdb_crop.tar

数据集预处理

python convert_to_records_multiCPU.py --imdb --nworks 8

训练的时候发现输出的文件为空。

try 了一下

example = tf.train.Example(features=tf.train.Features(feature={
 # 'height': _int64_feature(rows),
 # 'width': _int64_feature(cols),
 # 'depth': _int64_feature(depth),
 'age': _int64_feature(int(ages[index])),
 'gender': _int64_feature(int(genders[index])),
 'image_raw': _bytes_feature(image_raw),
 'file_name': _bytes_feature(str(file_name[index][0]))}))

报错

’40/nm1102140_rm3713850624_1974-7-29_2013.jpg’ has type <class ‘str’>, but expected one of: ((<class ‘bytes’>,),)

去掉

'file_name': _bytes_feature(str(file_name[index][0]))

程序可以正常跑了
训练的时候报错

Invalid argument: Name: <unknown>, Feature: file_name (data type: st
ring) is required but could not be found.

修改 file_name 行如下

'file_name': _bytes_feature(bytes(file_name[index][0],'utf-8'))}))

重新生成。。。

或者换成

python convert_to_records.py –imdb

就好了。

下载models:https://pan.baidu.com/s/1dFewgqH

训练好的model

https://pan.baidu.com/s/1bpllJg7

Train

python3  train.py --lr 1e-3 --weight_decay 1e-5 --epoch 6 --batch_size 128 --keep_prob 0.8 --cuda

Test 选出最好的模型

python3 test.py --images "./data/test" --model_path "./models" --batch_size 128 --choose_best --cuda
Age_MAE:7.07,Gender_Acc:80.92%,Age_model:./models/model.ckpt-12001,Gender_model:./models/model.ckpt-9001
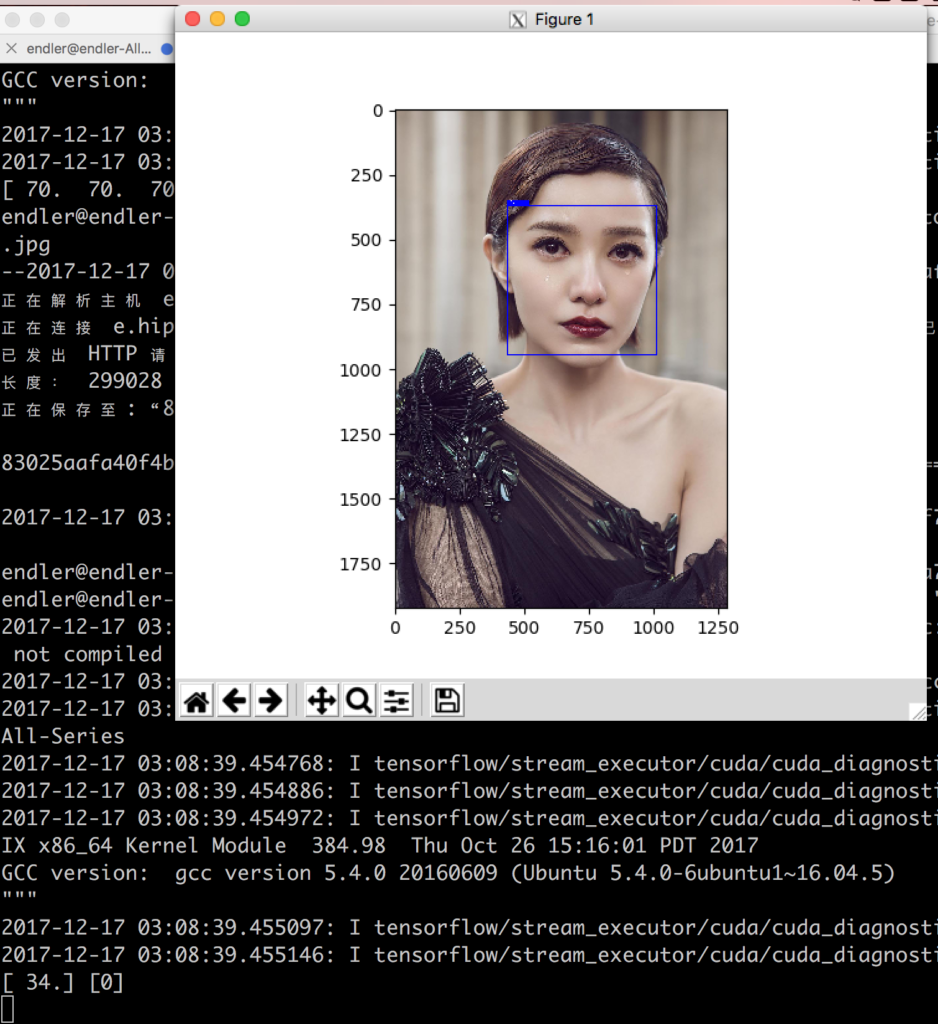
用自己的图片测试

python3 eval.py --I "./demo/demo.jpg" --M "./models/" --font_scale 1 --thickness 1


另一个Keras 的实现: Keras 实现的性别年龄检测

YOLO9000调试笔记

目前能找到的分类最多的图像识别。效率还不错。

据说有更牛逼的,可惜还没开源。

马里兰大学的R-FCN
https://mp.weixin.qq.com/s/HPzQST8cq5lBhU3wnz7-cg

调试 YOLO 9000 的代码。

darknet 提供了 yolo.weights 下载,但是没提供9000的。先找个现成的(如下),腾出功夫来,再自己训练个试试。

git clone --recursive https://github.com/philipperemy/yolo-9000.git
cd yolo-9000
cat yolo9000-weights/x* > yolo9000-weights/yolo9000.weights # it was generated from split -b 95m yolo9000.weights
md5sum yolo9000-weights/yolo9000.weights # d74ee8d5909f3b7446e9b350b4dd0f44  yolo9000.weights
cd darknet 
make # Will run on CPU. For GPU support, scroll down!
./darknet detector test cfg/combine9k.data cfg/yolo9000.cfg ../yolo9000-weights/yolo9000.weights data/horses.jpg

如果想用 GPU跑,请在make 前执行如下

export PATH=/usr/local/cuda-8.0/bin:$PATH
export LD_LIBRARY_PATH=/usr/local/cuda-8.0/lib64:$LD_LIBRARY_PATH
vim Makefile # Change the first two lines to: GPU=1 and CUDNN=1. You can also use emacs or nano!

darknet @ 1e72980

注意,darknet 不要checkout 最新的,会报错误。

段错误 (核心已转储)

测试效果。。。。9419个分类比1000的精细许多。

Tensorflow Android Demo 使用 Yolo

它默认支持三种网络,

TF_OD_API, MULTIBOX, YOLO;

除了 YOLO ,都给了下载链接,想试试 YOLO ,没找到

graph-tiny-yolo-voc.pb

的下载,自己动手丰衣足食。

git clone git@github.com:thtrieu/darkflow.git
cd darkflow
python3 setup.py build_ext --inplace
pip install -e .

下载对应的 yolo weight 文件

wget https://pjreddie.com/media/files/yolo.weights

更多权重文件下载 :https://drive.google.com/drive/folders/0B1tW_VtY7onidEwyQ2FtQVplWEU

https://pjreddie.com/darknet/yolo/

flow --model cfg/yolo.cfg --load yolo.weights --savepb
Parsing ./cfg/yolo.cfg
Parsing cfg/yolo.cfg
Loading yolo.weights ...
Successfully identified 203934260 bytes
Finished in 0.008934736251831055s
Model has a coco model name, loading coco labels.

Building net ...
Source | Train? | Layer description | Output size
-------+--------+----------------------------------+---------------
 | | input | (?, 608, 608, 3)
 Load | Yep! | conv 3x3p1_1 +bnorm leaky | (?, 608, 608, 32)
 Load | Yep! | maxp 2x2p0_2 | (?, 304, 304, 32)
 Load | Yep! | conv 3x3p1_1 +bnorm leaky | (?, 304, 304, 64)
 Load | Yep! | maxp 2x2p0_2 | (?, 152, 152, 64)
 Load | Yep! | conv 3x3p1_1 +bnorm leaky | (?, 152, 152, 128)
 Load | Yep! | conv 1x1p0_1 +bnorm leaky | (?, 152, 152, 64)
 Load | Yep! | conv 3x3p1_1 +bnorm leaky | (?, 152, 152, 128)
 Load | Yep! | maxp 2x2p0_2 | (?, 76, 76, 128)
 Load | Yep! | conv 3x3p1_1 +bnorm leaky | (?, 76, 76, 256)
 Load | Yep! | conv 1x1p0_1 +bnorm leaky | (?, 76, 76, 128)
 Load | Yep! | conv 3x3p1_1 +bnorm leaky | (?, 76, 76, 256)
 Load | Yep! | maxp 2x2p0_2 | (?, 38, 38, 256)
 Load | Yep! | conv 3x3p1_1 +bnorm leaky | (?, 38, 38, 512)
 Load | Yep! | conv 1x1p0_1 +bnorm leaky | (?, 38, 38, 256)
 Load | Yep! | conv 3x3p1_1 +bnorm leaky | (?, 38, 38, 512)
 Load | Yep! | conv 1x1p0_1 +bnorm leaky | (?, 38, 38, 256)
 Load | Yep! | conv 3x3p1_1 +bnorm leaky | (?, 38, 38, 512)
 Load | Yep! | maxp 2x2p0_2 | (?, 19, 19, 512)
 Load | Yep! | conv 3x3p1_1 +bnorm leaky | (?, 19, 19, 1024)
 Load | Yep! | conv 1x1p0_1 +bnorm leaky | (?, 19, 19, 512)
 Load | Yep! | conv 3x3p1_1 +bnorm leaky | (?, 19, 19, 1024)
 Load | Yep! | conv 1x1p0_1 +bnorm leaky | (?, 19, 19, 512)
 Load | Yep! | conv 3x3p1_1 +bnorm leaky | (?, 19, 19, 1024)
 Load | Yep! | conv 3x3p1_1 +bnorm leaky | (?, 19, 19, 1024)
 Load | Yep! | conv 3x3p1_1 +bnorm leaky | (?, 19, 19, 1024)
 Load | Yep! | concat [16] | (?, 38, 38, 512)
 Load | Yep! | conv 1x1p0_1 +bnorm leaky | (?, 38, 38, 64)
 Load | Yep! | local flatten 2x2 | (?, 19, 19, 256)
 Load | Yep! | concat [27, 24] | (?, 19, 19, 1280)
 Load | Yep! | conv 3x3p1_1 +bnorm leaky | (?, 19, 19, 1024)
 Load | Yep! | conv 1x1p0_1 linear | (?, 19, 19, 425)
-------+--------+----------------------------------+---------------
Running entirely on CPU
2017-12-08 17:49:27.012124: I tensorflow/core/platform/cpu_feature_guard.cc:137] Your CPU supports instructions that this TensorFlow binary was not compiled to use: SSE4.1 SSE4.2 AVX AVX2 FMA
Finished in 5.091068267822266s

Rebuild a constant version ...
Done

训练好的文件在 ./built_graph/ 文件夹

将生成的文件拷贝到

android_asset

编译成功。。。

效果不是很理想,很多东西被认成  person 了。。。

semantic-segmentation-pytorch (语义分割)调试笔记

GITHUB:https://github.com/hangzhaomit/semantic-segmentation-pytorch

chmod +x download_ADE20K.sh
./download_ADE20K.sh
python train.py  --batch_size_per_gpu 4

(用的单卡1080ti  建议 8 以下,否则爆内存) 官方建议 2 – 8 个 Titan xp

不加  batch_size_per_gpu 的时候,报如下错误。

THCudaCheck FAIL file=/tmp/luarocks_cutorch-scm-1-3726/cutorch/lib/THC/generic/THCStorage.cu line=66 error=2 : out of memory

Training  ….

epoch 一共 100轮,跑了 10几个小时,跑了26。用 20 轮的测一下

python test.py --id MODEL_ID --test_img TEST_IMG

MODEL_ID  是  ./ckpt/    下某一个子目录的名字

命令大概长这样

python3 test.py --test_img demo1.png --id baseline-resnet34_dilated8-c1_bilinear-ngpus1-batchSize4-imgSize384-segSize384-lr_encoder0.001-lr_decoder0.01-epoch100-decay0.0001 --suffix _epoch100.pth

测试结果

50轮了,测试发现结果是一样的。。。

100轮结束后的效果

pix2pixHD 调试笔记(条件GAN高分辨率图像合成与语义编辑)

GITHUB:https://github.com/NVIDIA/pix2pixHD

Install PyTorch http://pytorch.org/

pip3 install dominate
pip3 install sklearn
pip3 install sets

sets 要安装好久。。。。 请耐心等待。。

git clone https://github.com/NVIDIA/pix2pixHD
cd pix2pixHD

下载训练好的权重集到  ./checkpoints/label2city_1024p/ 目录

https://drive.google.com/file/d/1h9SykUnuZul7J3Nbms2QGH1wa85nbN2-/view?usp=sharing

698M ,漫长的等待。。。

报错

TypeError: cuda() got an unexpected keyword argument 'device_id'

~/models/networks.py 文件49,59行 改为

netG.cuda(gpu_ids[0])

test  run , 成功

python3 test.py --name label2city_1024p --netG local --ngf 32 --resize_or_crop none

运行结果 :

http://kaishixue.com/test_latest/index.html


运行另外一个 test   ./scripts/test_1024p_feat.sh

python3 encode_features.py --name label2city_1024p_feat --netG local --ngf 32 --resize_or_crop none;

报错

TypeError: eq received an invalid combination of arguments - got (numpy.int64), but expected one of:
 * (int value)
 didn't match because some of the arguments have invalid types: (numpy.int64)
 * (torch.cuda.IntTensor other)
 didn't match because some of the arguments have invalid types: (numpy.int64)

models/networks.py  286 行  torch.Tensor 操作时的错。

indices = (inst == i).nonzero() # n x 4

修改为

indices = (inst == i.item()).nonzero()

models/pix2pixHD_model.py  220 行 修改为

idx = (inst == i.item()).nonzero()

继续执行命令 ,源码中的 –netG 多了一个  –

python3 test.py --name label2city_1024p_feat --netG local --ngf 32 --resize_or_crop none --instance_feat

将权重集复制到   ./checkpoints/label2city_1024p_feat/

修改  models/base_model.py 73行 (python3.5)

#from sets import Set
 not_initialized = set()

models/pix2pixHD_model.py  203行  i 修改为

i.item()

TensorFlow Lite iOS 调试笔记

下载 tensorflow 代码,到目录

/tensorflow/contrib/lite/examples/ios/simple/


安装pods

sudo gem install cocoapods
pod install --verbose --no-repo-update

漫长的等待后打开

simple.xcworkspace

报错

tensorflow/contrib/lite/schema/schema_generated.h:7:10: 'flatbuffers/flatbuffers.h' file not found

FlatBuffers 没装

xcode-select --install
brew install automake
brew install libtool

下面命令需要退到 根目录下执行,否则找不到对应目录,另需已安装 wget

tensorflow/contrib/lite/download_dependencies.sh

在 cp 前 莫名 有个 echo ,导致 cp 不执行。需要手动下载这些包,再传到制定目录。

tensorflow/contrib/lite/build_ios_universal_lib.sh

编译不成功,感觉 这个 lite 版的 ios 还没有完工。也可能是我这台 imac的问题,回家用macpro 试试再说。

deep-image-prior 调试笔记

GITHUB:https://github.com/DmitryUlyanov/deep-image-prior

使用 jupyter

执行   jupyter notebook 进入

默认只支持本地,网络访问参考  图片的语义分割实战

执行哪个文件都报错(貌似  3.5 才报错  2.7 没事)

 No module named 'skip'

修改  ~/models/__init__.py  前几行

from models.skip import skip
from models.texture_nets import get_texture_nets
from models.resnet import ResNet
from models.unet import UNet

修改 ~/models/common.py

from downsampler import Downsampler -->  from models.downsampler import Downsampler

出错的地方有点多,反正找不到就加 models 吧  /(ㄒoㄒ)/~~

例外:

~/utils/denoising_utils.py

from common_utils import *   -->   from utils.common_utils import *


报错

float() argument must be a string or a number, not '_ImageCrop'

img_np 进行如下修改

img_np = get_image(fname, imsize)[1]


RUN 成功,效果还不错

这套东西在  python3.5 上坑实在太多,建议还是 2.7 下跑。

重新布了一个 2.7 的环境,吐槽一下  pytorch 直接pip 在线安装太慢了。下载下来再装快的多

生成混淆图
2981轮迭代
2499轮迭代
1987轮迭代
1475轮迭代
993轮迭代
481轮迭代

TensorFlow Demo labels 文件中文版(汉化完成)

使用相关: TensorFlow Lite 初探

试了下各种自动翻译,效果都不理想。还是自己动手丰衣足食。顺带背单词了。

手工翻了一半,用有道翻译了一半。2017.12.7 发现错误会随时更新。

12.8 更新了3个有道翻错的词。
继续阅读TensorFlow Demo labels 文件中文版(汉化完成)

mozilla语音识别框架 deepspeech 初探

安装

pip3 install deepspeech-gpu

运行

deepspeech output_model.pb my_audio_file.wav alphabet.txt

deepspeech output_graph.pb LDC93S1.wav alphabet.txt

报错

2017-12-01 09:35:28.879923: F tensorflow/core/platform/cpu_feature_guard.cc:35] The TensorFlow library was compiled to use AVX2 instructions, but these aren't available on your machine.
Aborted (core dumped)

issue 说明 :

https://github.com/mozilla/DeepSpeech/issues/1023

lscpu

Intel(R) Xeon(R) CPU E5-2620 v2 @ 2.10GHz

CPU 只有 avx 指令集,没有 avx2

换到 阿里云的机器,CPU版本是 E5-2682 .可以用

pip3 install deepspeech

deepspeech output_graph.pb LDC93S1.wav alphabet.txt

output_graph.pb 下载地址

wget  https://s3.amazonaws.com/deep-speech/output_graph.pb

LDC93S1.wav  在

https://github.com/mozilla/DeepSpeech/tree/master/data/smoke_test

自己录了几段都不认,对音频格式了解不多,留个坑以后填。

alphabet.txt 在

wget https://raw.githubusercontent.com/mozilla/DeepSpeech/master/data/alphabet.txt

识别的结果:

(CPU,5.394s) shehadyeducksoingrecywachworallyear

(GPU,1.286s) she had ye duck so ingrecy wachwor all year

不知道为毛线,CPU版没空格,GPU版有。

原文对照:

She had your dark suit in greasy wash water all year.